FT1 Series Frameless Motor User Guide
Installation Guide
Stator & Housing
1) Housing material
It is recommended that the stator be assembled in a metal housing by means of bonding, heat sleeve or axial fastening. Installation in the correct structural manner results in optimum thermal conductivity for the entire machine. Aluminum alloy has good thermal conductivity and strength-to-weight ratio, so it is preferred. Carbon steel, cast iron, 400 series stainless steel alloys and other magnetically conductive ferrous metals are not recommended.
2) Stator mounting
1. Adhesive Bonding
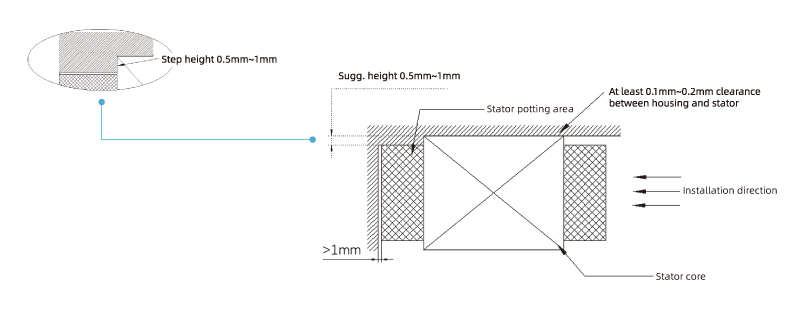
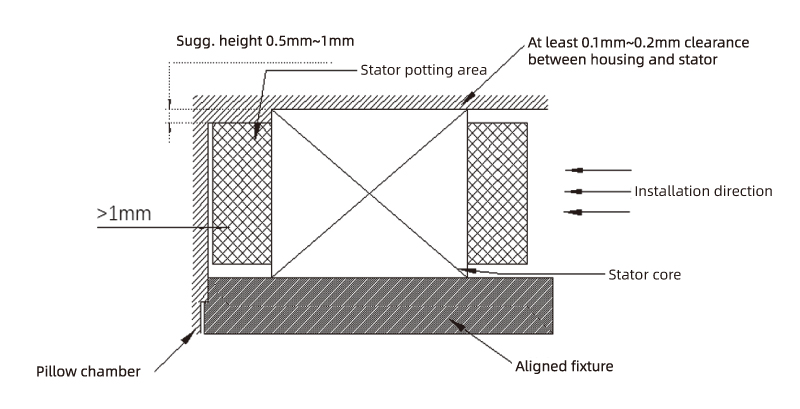
For motors with low torque, epoxy adhesives such as Hysol EA934NA, 3M Scotchweld 2214, etc. or anaerobic water such as Loctite638/648 can be used as the bonding agent. In order to ensure the reliability of the bonding, the stator housing should be designed as a cylindrical cavity, and it is recommended that a small step (0.5mm~1mm recommended) be added axially within to position the stator to ensure that the stator is mounted in place. This is shown in the figure below:

When using the adhesive bonding , it is recommended to add some adhesive grooves on the mounting surface inside the housing to improve the bonding; if the epoxy structural adhesive needs to be heated and cured, note that the heating temperature should not exceed 155℃ to avoid damage to the stator core. For different coefficients of expansion [steel laminations vs. aluminum housings], excessive temperatures may cause failures. When used in accordance with the manufacturer's recommendations, these adhesives will provide excellent strength properties over a long period of time. The inside and the outside surfaces of the housing of the stator need to be thoroughly cleaned prior to bonding.
2. Heat Sleeve Assembly
It is recommended that the stator be mounted with the heat sleeve process if without the use of an auxiliary adhesive, since the stator core is a laminated construction and is not suitable for cold pressing. When selecting a heat sleeve, there is an interference fit between the housing and the stator. Specific tolerances should be designed with reference to the coefficients of thermal expansion of the different materials. Please check the required pull-off force for the actual working conditions, and thus to decide whether the assembly of the heat sleeve can be completed at different temperatures.
3. Axial Fastening Assembly
When there is a need to disassemble the motor, or when the output torque is small, the stator can be assembled by axial fastening, but this method is not recommended. When this method is selected, adopt a clearance fit between the stator and the housing, i.e., a sliding assembly, and the stator can be fixed by axial fastening, i.e., by adding new plates. The motor is a moving part that vibrates during operation, which amplifies the risk of loosening of the fasteners, so this method should not be used for mass-produced products.
Note:
Whether it is bonding, hot-setting or axial fastening, it is a type of clearance fit in actual working conditions. A clear coaxial datum should be assigned during the assembly to ensure the coaxiality of the stator and the housing, and positioning fixtures should be prepared to improve the coaxiality.

Rotor & Axis
Frameless motors stand out for their rotor assembly, which includes high-performance rare-earth magnets neatly fixed to a metal rotor ring. Common in industrial settings, this rotor ring is usually made from metal and is assembled using one of two methods: cold pressing or adhesive bonding. The exact shaft tolerances are determined by the assembly method used.
To guarantee superior motor performance, adhere to these key assembly principles when constructing the rotor and stator:
1. Align the rotor magnets with the stator core's center to ensure optimal magnetic interaction.
2. If absolute alignment cannot be confirmed, ensure that the magnetic portion fully encompasses the stator core within the maximum size limits.
Installation Precautions
Precautions
1. The uninstalled magnetic rotor emits a potent magnetic field. Be mindful of its influence on nearby electronic devices due to strong magnetism.
2. Due to the strong magnetic fields that can draw in metallic objects, it is crucial to wear gloves during installation to protect your fingers and palms from potential injuries. Additionally, to prevent damage, keep cell phones, watches, and magnetic data media at a safe distance from the magnetic field.
3. The motor stator's metal parts must be properly grounded within the housing for operator safety. Failure to do so may compromise safety.
4. When not in use, store the rotor and stator in a dry area to prevent rapid rusting caused by excessive moisture.
 Global - English
 Spanish - Español
 Arabic - عربي
 Italian - Italiano
 Polish - Polski
 French - Français
 Russian - Pусский язык
 Ukrainian - українська
 Chinese - 中文
 Korean - 한국어
 Turkish - Türkçe
 Vietnamese - Tiếng Việt